Likewise, we will also share the instructions on how to boot to TWRP or permanent installation of the recovery. Talking about which, you will be able to learn the type of recovery file you would be needing (twrp.img and twrp.zip) and more importantly when they would be needed. It’s going to be a long journey ahead, so stick with us!
The Need for a Custom Recovery
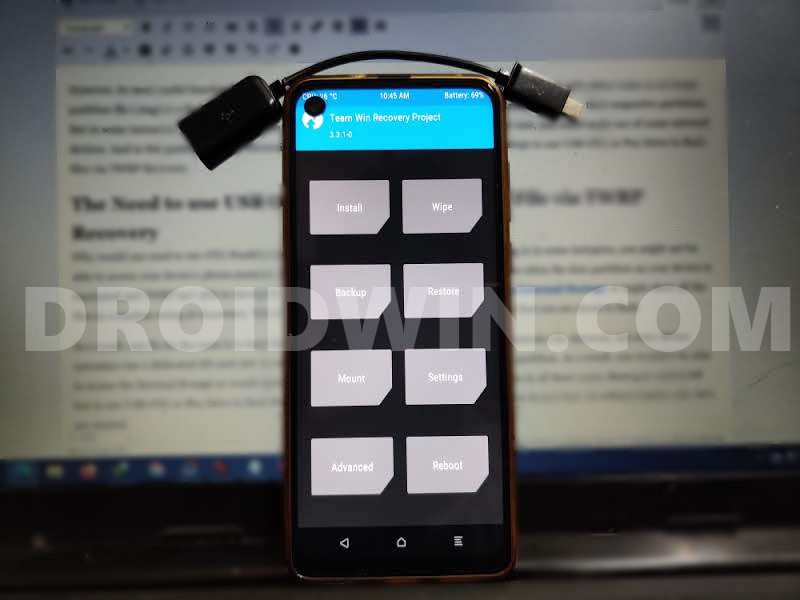
By default near about every OEM ships their device with a locked bootloader. They do so because they want you, the user, to only use the ecosystem that they have provided. But at the same time, they also leave a slight window open for the tech enthusiasts. Hence the interested users could make full use of this opportunity and unlock their device’s bootloader. Once you do so, you could then carry out a plentitude of tweaks on your device. These include the likes of flashing custom ROMs, custom kernels, having access to the system partition by rooting via Magisk. Likewise, you could install ZIP and IMG files, flash mods, Magisk Modules, Substratum Themes, and the likes. However most of these tweaks to be effectively carried out, you would require a helping hand. And there is no better helping hand than a custom recovery. Most of the tweaks that we have mentioned above could easily be carried out via the custom build recovery itself. In earlier times, users generally flocked to the CWM recovery. While it was able to successfully execute most of the tweaks, yet it wasn’t touch-based. This meant that you had to use the hardware keys to perform any action. To overcome this issue, the Team Win Recovery Project made its way over to the custom development, and the rest, as you would say, is history. All in all, if you have unlocked the device’s bootloader, then this should usually be your go-to custom binary. On that note, here are the required instructions to install the TWRP Recovery on any Android device. Follow along.
How to Uninstall Magisk Modules using TWRP RecoveryHow to Fix TWRP 0MB Internal Memory IssueUse USB OTG or Pen Drive to Flash File via TWRP RecoveryHow to Copy Move Rename Delete Files and Folders via TWRP Recovery
How to Install TWRP Recovery on Android
We have broken down the installation steps into separate sections for ease of understanding. Proceed in the exact same sequence as mentioned. Droidwin and its members wouldn’t be held responsible in case of a thermonuclear war, your alarm doesn’t wake you up, or if anything happens to your device and data by performing the below steps.
STEP 1: Take a Backup
Installing the TWRP Recovery doesn’t usually lead to data loss. But it’s a prerequisite such as unlocking the bootloader does. Furthermore, in some instances, you might have to decrypt the data partition by performing a factory reset. All these scenarios would in turn erase the data from your device. So it is highly recommended to take a backup of all the data on your device.
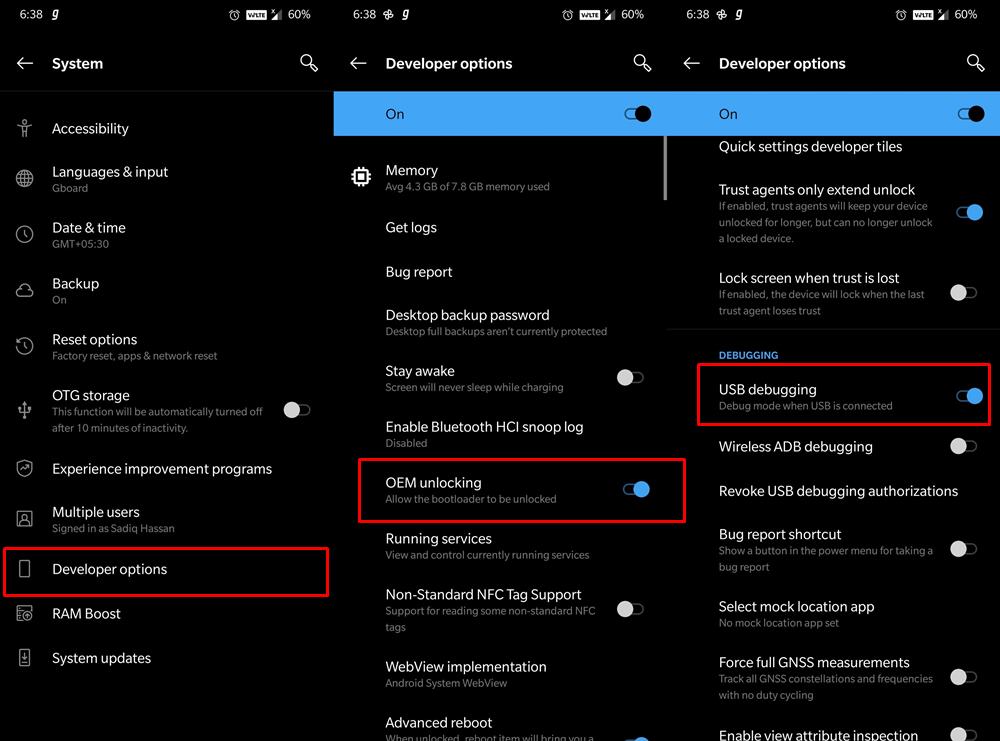
STEP 2: Enable USB Debugging and OEM Unlocking
The steps to install the TWRP Recovery on Android requires you to enable USB Debugging and OEM Unlocking. [Don’t Miss: How to Enable USB Debugging on a Broken Android Devic’s Screen]. The first one is needed so that your device is able to interact with the PC in ADB Mode. This would in turn be used to boot your device to Fastboot to install the recovery.
Likewise, OEM Unlocking is required to take permission for the bootloader unlocking. (If you have already unlocked the bootloader, then you don’t need to enable OEM Unlocking, rather you should only enable USB Debugging). With that said, here are the required instruction steps to enable both these options on your device:
STEP 3: Unlock Bootloader
Next up, you will also have to unlock the bootloader on your device. Until and unless you do so, you wouldn’t be able to install any custom binary, including TWRP Recovery on your Android device. But do keep in mind that the unlocking process will make the device’s warranty null and void, and would also erase all the data from your device. If that’s well and good, then refer to our device-specific guides:
How to Unlock Bootloader on Google Pixel DevicesHow to Unlock Bootloader on any Samsung Device [New VaultKeeper Method]A Universal Guide to Unlock Bootloader on any Realme DeviceSteps to Unlock Bootloader on any Motorola DeviceHow to Unlock the Bootloader on OnePlusHow to Unlock Bootloader on Vivo
STEP 4: Install ADB and Fastboot on PC
You will also have to install the Android SDK Platform Tools on your PC. This is the official ADB and Fastboot binary provided by Google which helps in establishing a successful connection between your device and the PC in ADB and Fastboot modes.
STEP 5: Download TWRP Recovery for your Android Device
Now get hold of your device’s TWRP Recovery file. The official builds have been hosted on TWRP official site. On the other hand, if your device isn’t on that list, then you may also download the unofficial builds from XDA. While some devices have both the TWRP IMG and ZIP files, others only have the TWRP IMG file. The reason for the same will be cleared later on in this guide. As of now, you simply download the available TWRP file/files for your device.
Furthermore, there is even an option of creating and porting TWRP Recovery for your Android device. While it does require technical expertise, but you may give it a try as well (if there’s no official/unofficial TWRP for your device): How to Create and Port TWRP Recovery to any Android Device. With that said, let’s proceed to the next step to install TWRP Recovery on any Android device.
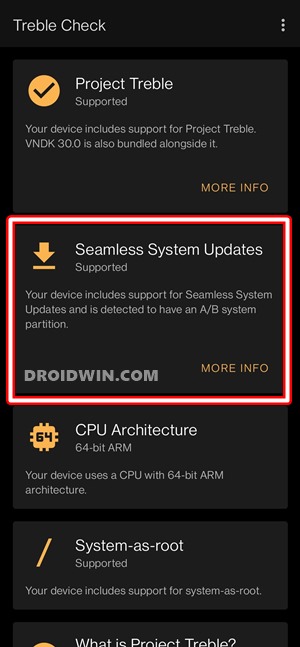
STEP 6: Check if the Device has A/B Partition or A Partition
If your device is A-only, then it would be having the recovery partition. Hence you could directly flash the TWRP IMG file to the recovery partition. On the other hand, if it is A/B, then there wouldn’t be any recovery partition, rather it is now taken care of by the boot partition. Accordingly, the fastboot command to flash TWRP Recovery has been set up. So it is of paramount importance to check if your device is a single partition or dual partition. So refer to the below instructions for the same. [Furthermore, I would highly suggest that you get acquainted with these A and A/B partition schemes on your device via this guide: How to Check and Change Current Active Slot on Android].
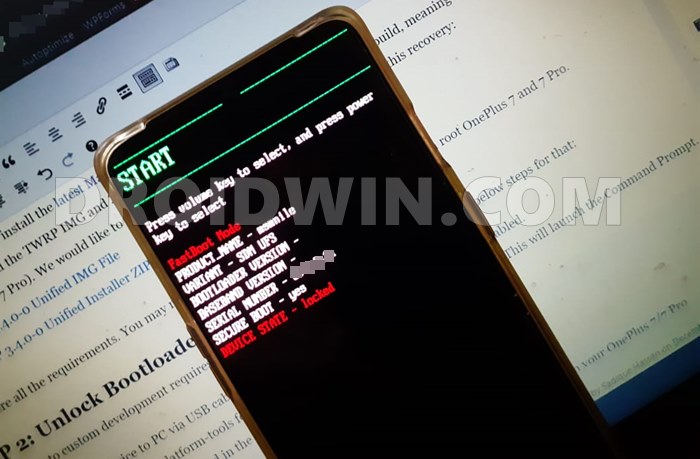
STEP 7: Boot Device to Fastboot Mode
Once done, proceed to the next step to install TWRP Recovery on your Android device. If the result from the test in STEP 6 came out to be A/B partition, then move to STEP 8B. Whereas if your device has only A partition then check out STEP 8A. if you wish to know more on this A/B vs A-only and its relation with TWRP, check out our guide on TWRP: fastboot flash vs fastboot boot: Which command to use?
STEP 8A: Install TWRP on an A-only Android Device
In these sets of devices, you still have the recovery partition, hence you could flash the TWRP IMG file to the recovery partition. Furthermore, for these devices, only the TWRP IMG file will be available since they don’t require a ZIP Installer. With that said, make sure to rename the downloaded recovery to twrp, hence the complete name becomes twrp.img. Now transfer this twrp.img file to the platform-tools folder. Likewise, reverify that the CMD window is still opened inside this platform-tools directory, if that is not the case then do so right away (by typing CMD in its address bar).
STEP 8B: Install TWRP on A/B Android Device
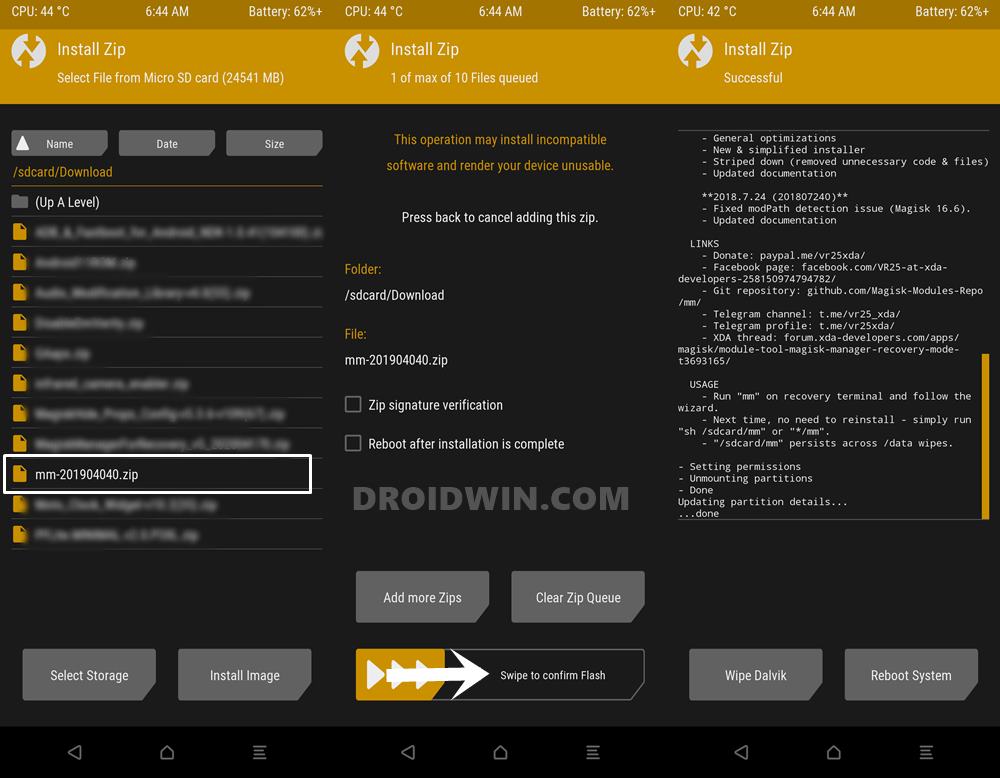
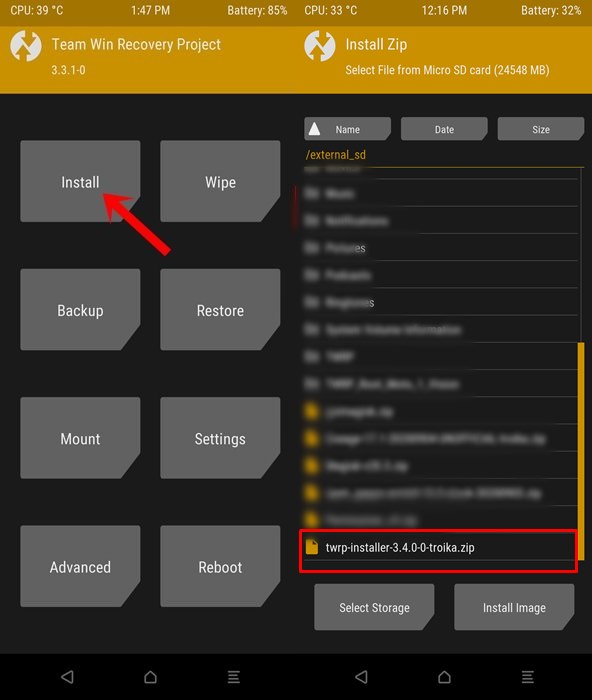
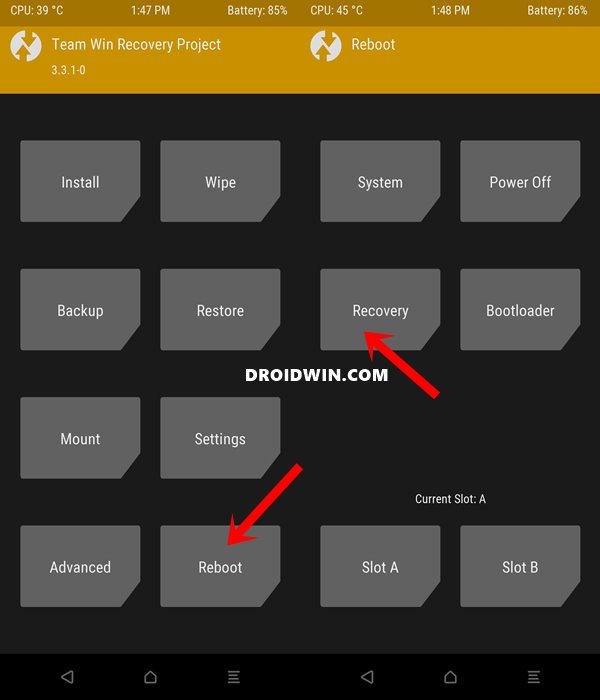
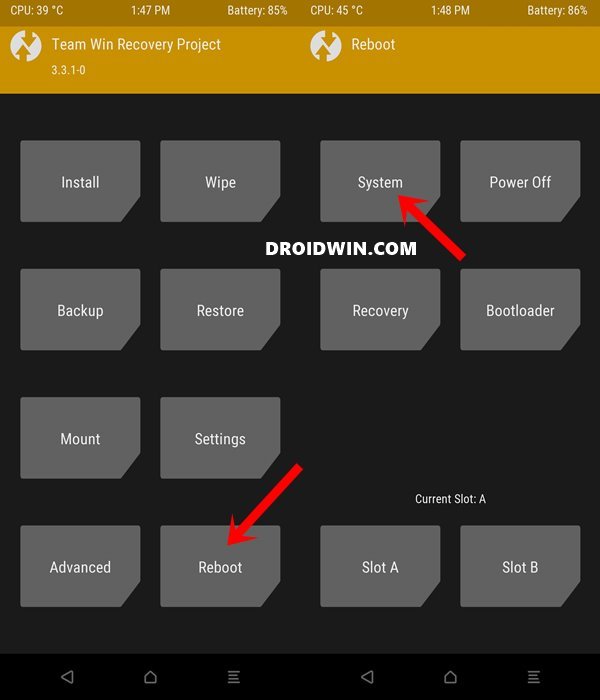
If you have come to this section, then your device is an A/B partition, hence it doesn’t have the recovery partition. As a result, we can not directly flash TWRP to the recovery partition. As things are taken care of by the boot partition, we will first boot your device to the TWRP via its IMG file and then permanently flash it via its ZIP file. Furthermore, as you might have noticed by now, these devices have both the TWRP ZIP and IMG files. So make sure you download both the variants (.zip and .img). Once downloaded, rename both the files to twrp, hence the complete file names would be twrp.zip and twrp.img. Now transfer the twrp.zip file to your device whereas transfer the twrp.img file to the platform-tools folder on your PC. Likewise, reverify that the CMD window is still opened inside this platform-tools directory, if that is not the case then do so right away (by typing CMD in its address bar). That’s it. This was all from this guide on how to install TWRP Recovery on any Android device. If you have any queries concerning the aforementioned steps, do let us know in the comments section below. We will get back to you with a solution at the earliest. With that said, let’s turn our attention towards some of the other useful resources that might help you out.
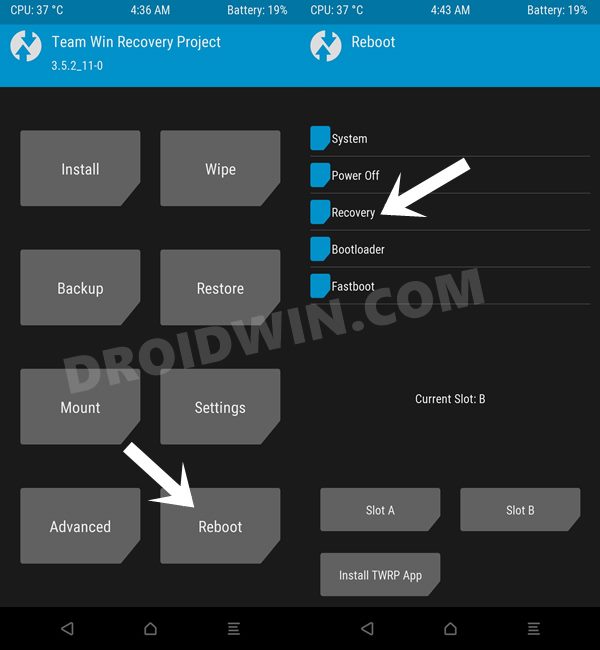
How to Boot to TWRP Recovery on Android
Now that you have successfully installed TWRP Recovery on your Android device, you might occasionally need to boot to it. For that, please refer to our detailed guide on How to Boot into Recovery TWRP Recovery. If you don’t wish to check out that guide then here are the shorter instructions: use the adb reboot recovery command or the fastboot reboot recovery command. You may also use your device’s hardware key combinations.
How to Use ADB and Fastboot Commands on Android Without PCDetailed Steps to Fix adb is not recognized ErrorHow to Fix Unauthorized Device with ADB CommandsExecute Android ADB Fastboot Commands Wirelessly
How to Update TWRP Recovery on Android
TWRP usually gets blessed with updates that fix underlying bugs and make it more stable to use. While the frequency of updates in the official TWRP is quite low as everything has been already taken care of by the developers before releasing it officially. However, if you have downloaded an unofficial build, then you might have to occasionally update the recovery. On that note, you may refer to our comprehensive guide to Update TWRP Recovery on any Android Device.
How to Install TWRP Recovery on Samsung devices
You cannot flash TWRP Recovery on Samsung devices by using Fastboot Commands. Rather there is a completely different set of rules to carry out this task. If you wish to know more about the same, then refer to our detailed coverage on How to Install TWRP Recovery on Samsung via Odin. If you don’t wish to check out that guide, then here are the instructions in short:
How to Remove/Uninstall TWRP from my Device?
If you no longer require TWRP Recovery and wish to revert to stock, then this guide shall help you out: How to Uninstall TWRP and Restore Stock Recovery on Android.
How to Install TWRP without ZIP File?
As I had earlier mentioned A/B devices need to have two sets of TWRP files: IMG and ZIP. However recently I came across a device (Motorola One Action), that is an A/B partition but only had the TWRP IMG file but no ZIP file. Turns out, that this wasn’t the only device and there were quite a few others belonging to this domain.
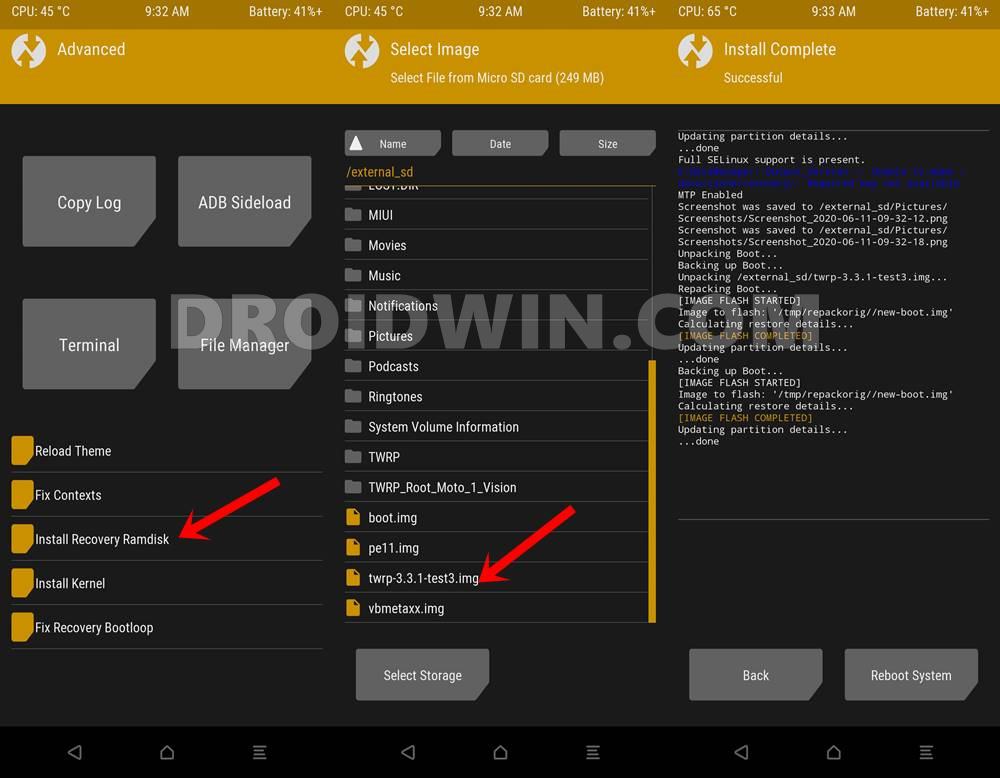
METHOD 1: Install TWRP to Ramdisk
I did some research and found out that for these devices, you would have to flash the TWRP IMG to their Ramdisk as well. In other words, first off you will boot to TWRP via fastboot boot twrp.img, and then from TWRP flash the IMG file to the Ramdisk for permanent installation. If your device falls under this category as well, then please refer to this guide: How to Permanently Install TWRP without TWRP ZIP File (only using TWRP.img file).
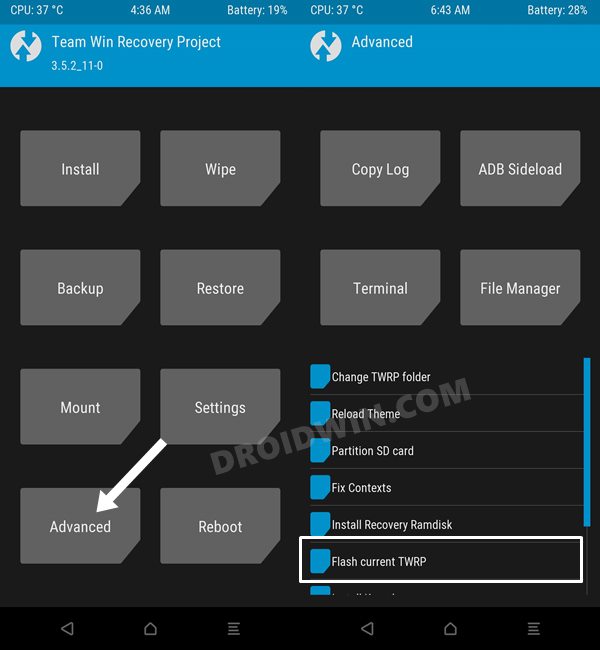
METHOD 2: Using Flash Current TWRP
On some devices, you wouldn’t find the Install Recovery Ramdisk, rather that has now been replaced with the Flash Current TWRP option. This feature would also come in handy in case your device only has the TWRP.img file but no ZIP. For the unaware, this feature automatically picks up the twrp.img that is currently temporarily booted to your device and would then permanently flash it.
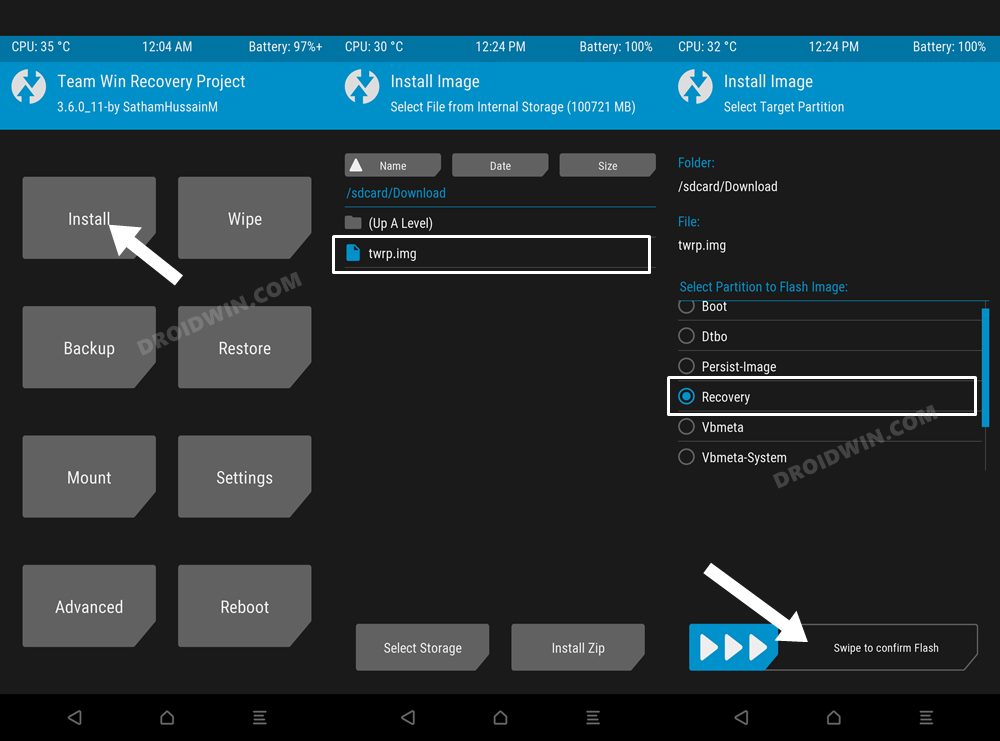
METHOD 3: Flash TWRP IMG from TWRP
If your device has the recovery partition, then you might not see the Install Recovery Ramdisk option. This is because you wouldn’t even need this feature in the first place. You could directly flash the TWRP to the recovery partition from the TWRP Recovery itself. Here’s how: On that note, we conclude this tutorial on how to install TWRP Recovery on any Android device. We have tried to cover all the important aspects of this custom recovery. However, if you feel we missed any, do share your views with us in the comments section below.
Install Custom ROMs on any Android Device- Includes A/B Partition[GUIDE] Flash ROMs/Magisk/TWRP/Kernels on A/B Partition DevicesHow to Flash Various Files in A/B Partition DevicesHow to Fix FAILED (remote: Command not allowed)
About Chief Editor